
SIP Tech Setup for MAC Users
Tech Setup
Complete the steps below on the machine you will be using for work. Please note that we cannot support the use of tablets or mobile devices of any kind, and we do not allow employees to use multiple machines. Additionally, you need to be connected to your modem through Ethernet cable, and you need to wear a USB headset with a wire that plugs into your machine. No WIFI. You will need your mobile device for our multi-factor authentication, so please have both your work machine and mobile device when working through these steps.
Note: This page is for MAC users only. If you are a PC user, click here.
For IT Support during business hours, click the chat icon on the right side of the page.
IT chat hours: Mon-Thurs 6 AM – 6 PM Pacific, Fri 6 AM -5 PM Pacific, Sat 6 AM -3 PM Pacific, Sun 8 AM – 3:30 PM Pacific
Expected setup time needed: Approximately 30 minutes
Step 1: Chrome Check
Ensure Chrome is Installed
You will need to use Google Chrome as your browser for your work with us. If you don’t already have Google Chrome, click here to download it.
If you aren’t already using Chrome to view this page, please swap over to that browser now (if you already have it installed), or swap once you have it downloaded.
To watch a video on installing Google Chrome on MAC, click here.
Adjust Chrome Settings
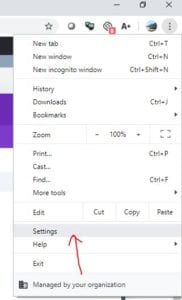
1. Click the stack of 3 dots on the upper-right of your screen. This will open a new browser tab.

2. Select “Settings” from the menu that appears:
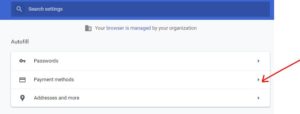
3. On the right menu bar of the new page, click into “Autofill”:

4. Click “Payment methods”:
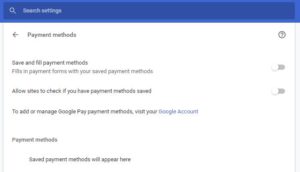
5. Make sure that both “Save and fill payment methods” and “Allow sites to check if you have payment methods saved” are toggled off, as shown in the image below.
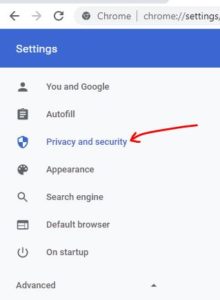
6. On the left-side “Settings” menu, click “Privacy and security”:
7. Click into “Site Settings”:
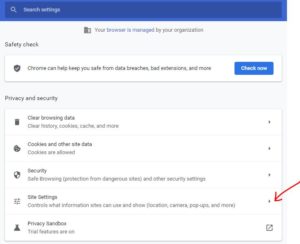
8. Scroll down and click into the “Pop-ups and redirects” row, under “Content”:
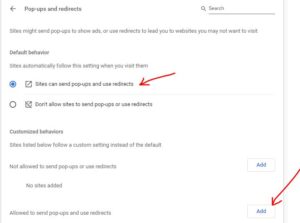
9. Make sure “Sites can send pop-ups and use redirects” is marked, and then click “Add” to the right of the “Allowed to send pop-ups and use redirects” text:
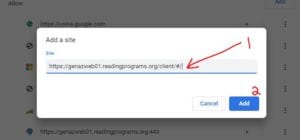
10. Paste the following URL into the field: https://genazweb01.readingprograms.org/client/#/. Then click the blue “Add” button to finalize your entry:
Step 2: Install SonicWall Mobile Connect VPN
Returning Employees: If you have Cisco AnyConnect VPN on your machine, please uninstall it and reboot prior to downloading the new VPN.
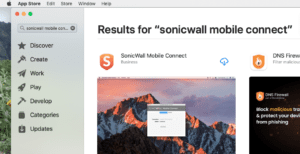
1. Click the following link to access the download from the App Store:
https://apps.apple.com/us/app/sonicwall-mobile-connect/id822514576?mt=12
Alternatively, you can type “Sonicwall Mobile Connect” into the App Store and find the application that way.
2. Click the icon of the cloud on the upper right to initiate the installation. Once installed, you’ll see the icon appear on your task bar.
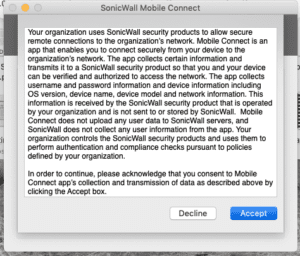
3. Click the SonicWall icon and then click the “Add Connection” option.
If a Terms and Conditions message displays, click “Accept”.
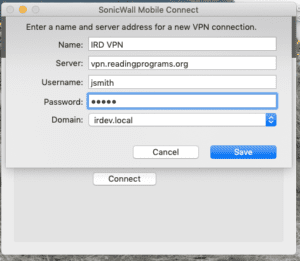
4. In the “Name” field, type “IRD VPN”. In the “Server” field, type “vpn.readingprograms.org”.
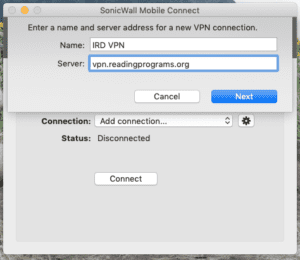
5. Click “Next” to expose the Username and Password fields. You will notice that the “Domain” field will auto-populate with “irdev.local”. If for some reason “irdev.local” doesn’t auto-populate in the Domain field, please manually type it in.
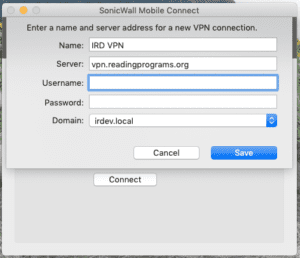
6. Click “Save”.
7. Proceed to Step 3: Install Microsoft Authenticator and Connect to VPN.
Step 3: Install Microsoft Authenticator and Connect to VPN
Part 1 of 3: Install Microsoft Authenticator App
This part is a one-time setup on your mobile device. Estimated time needed: 5 minutes
1. On your mobile device, download the Microsoft Authenticator app by clicking the appropriate link for your device below. If you already have Microsoft Authenticator on your device, you can skip this step, but please pay attention to the “If you already had Microsoft Authenticator” guidance in Step 2 of these instructions. The authenticator app is produced by “Microsoft Corporation”.
Apple App link: https://apps.apple.com/us/app/microsoft-authenticator/id983156458
Android App link: https://play.google.com/store/apps/details?id=com.azure.authenticator&hl=en_US&gl=US
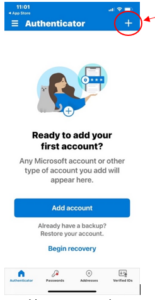
2. Once installed on your mobile device, open the app. Once you’ve passed the terms and conditions, click the white + icon on the upper right of the screen.
– Click “Work or school account”
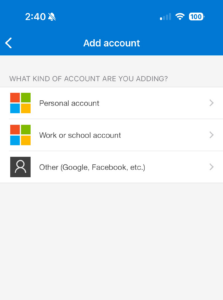
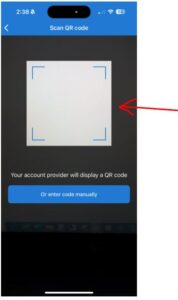
– Click “Scan QR code” from the pop-up that appears

After you click “Scan QR code”, your screen will look similar to this:
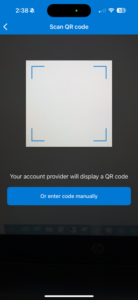
– Use this QR scanner when prompted later on in the instructions.
If you already had Microsoft Authenticator on your device prior to reading these instructions today, do the following:
– Open your Authenticator app.
– Click the little + icon on the upper right of the blue navigation bar.
– Click “Work or school account”
– Click “Scan QR code” from the pop-up that appears
– Use this QR scanner when prompted later on in the instructions.
Part 2 of 3: Configure VPN for 2 Factor Authentication
This part is a one-time setup on your computer. Estimated time needed: 10-15 minutes.
You will need to switch back to your computer for this part, do not attempt this step on your mobile device.
1. Make sure you have already installed your VPN in the previous instructions “Step 2: Install SonicWall Mobile Connect VPN”. Open your Chrome browser and navigate to https://vpn.readingprograms.org.
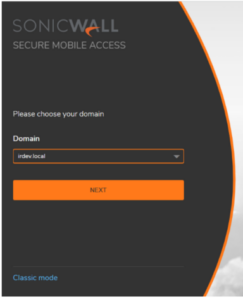
2. On the login screen of the website you just navigated to, select “irdev.local” from the Domain dropdown. It should look like the image below after you select “irdev.local”. Click the orange “Next” button when done.
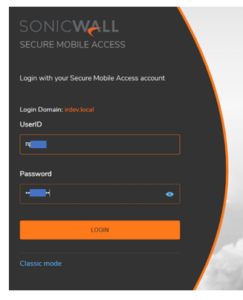
3. Enter your IRD username and your IRD password. Your username and password can be found in your tech setup email. Click the orange “Login” button when done.
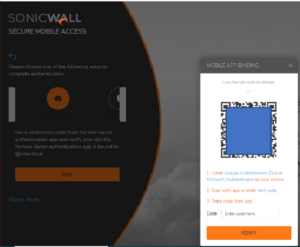
4. Once logged into the portal, you’ll see a pop-up that asks you to install Google Authenticator, Duo, or Microsoft Authenticator. You completed the download in the previous section, so what you need to do now is make sure your mobile device is displaying the Microsoft Authenticator app’s QR code scanner. Next, physically lift your phone up and hold it facing the computer screen (outward camera facing the computer screen), centering the Authenticator app’s view finder over the QR code. This allows you to scan the QR code that’s showing on your computer screen.
This is what the pop-up in the SonicWall portal will look like on your computer screen:
IMPORTANT: If your computer screen looks like the snip below when you log into the VPN portal, your VPN may still be connected to your Authenticator app from the last time you worked here. If you see a screen like the one below, please skip to “Part 3 of 3: Launch VPN with Authenticator” below.
As a reminder, here’s what your Microsoft Authenticator’s QR scanner looks like on your mobile screen:
After you physically hold your mobile device up to the computer screen to use the scanner, here’s what it looks like to center the computer’s SonicWall QR code on your mobile screen: 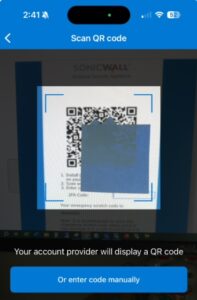
NOTE: Once the QR code is within the view finder, it will automatically scan.
5. The Authenticator app on your mobile device will display a code.
NOTE: The code will be available for 30 seconds and then a new code will appear (this cycle repeats itself). Take as much time as you need, just be sure to enter the code that exists on your screen when you go to enter the digits. Do not try to use a code that is no longer displayed on your Authenticator screen.
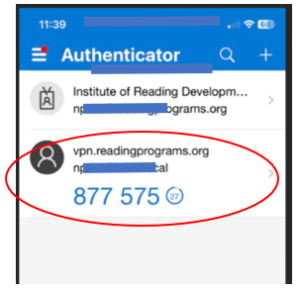
6. Enter the code into the VPN “Code” field with no spaces (e.g.: if the code is 877 575, enter it as 877575). This will connect the Authenticator App to your VPN account. Click the orange “Verify” button when done.

7. Log out of the VPN portal. Click the icon with the letters on the upper right of the screen. Click “Log Out”. You are now finished with the one-time setup of Part 2.
Part 3 of 3: Launch VPN with Authenticator
This part will need to be done each time you connect to VPN. Estimated time Needed: 1 minute
You will need your mobile device and your computer to log onto VPN.
1. On your computer, return to Sonicwall Mobile Connect. Make sure your credentials are filled in and then click the blue “Login” button.

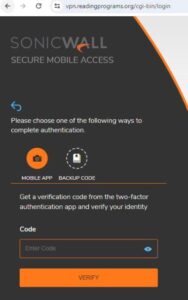
2. When prompted by the “Get a verification code from the two-factor authentication app and verify your identity” message (shown below), open your Microsoft Authenticator app on your mobile device and enter the code you see there. Remember that the code on your Authenticator app will change every 30 seconds—just make sure you use the code that’s displayed at the time you go to enter the digits. Enter the code into the VPN “Password” field with no spaces (e.g.: if the code is 877 575, enter it as 877575).
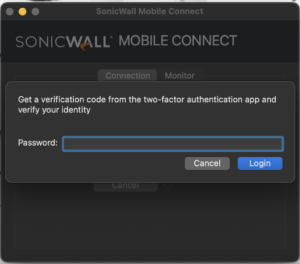
Click “Login” once you’ve entered the code.
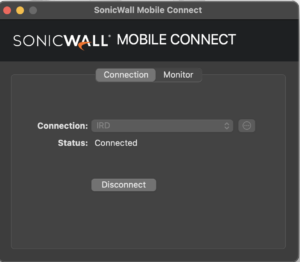
3. Your VPN will now cycle through its connection procedure and connect you to our network.
Once connected, you should see the following screen:
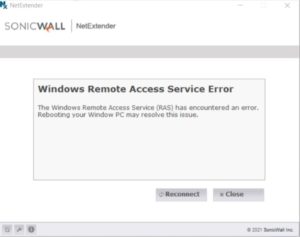
If you get an error that looks like the one below after trying to connect, please reboot your machine and then try connecting again. If the error persists, contact IT Help Desk via the chat on this page.
Problem-Solving Guidance
1. Check that you have the server set to “vpn.readingprograms.org” and the domain set to “irdev.local” (there are no spaces in either, and “irdev.local” must be lower case).
2. Check that your username exactly matches what we sent to you in your tech setup email. It’s best to copy-paste directly from the email.
3. Try entering your password again. For accuracy, copy-paste directly from the email.
4. If the above guidance doesn’t help, try typing “IRDEV\” in front of your username (e.g.: IRDEV\jsmith). Enter your password as usual.
5. If you’re still encountering trouble, please chat with an IT technician, using the chat pop-out on the right of this web page.
Step 4: Install and Launch SIP Softphone
Install your SIP Softphone by clicking the link below.
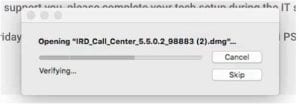
Click here to download IRD Call Center SIP Station for MAC.
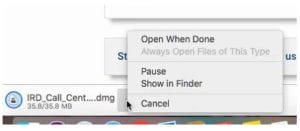
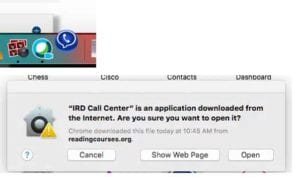
1. In the bottom-left of your screen, click the upward arrow on the executable file when it appears:

2. Click “Open When Done” from the pop-up list that appears:
3. The pop-up below with the CounterPath agreement will appear:
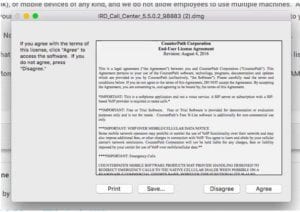
4. Click “Agree”, and wait for the app to finish installing:
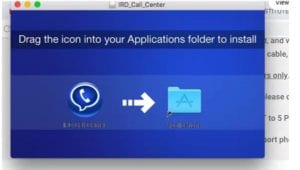
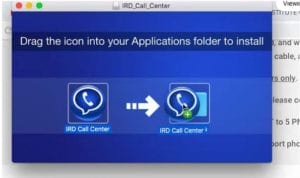
5. The pop-up window will adjust to show the image below. Drag the IRD Call Center icon on the left into the “Applications” folder on the right:
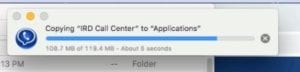
You may see a progress bar appear that looks like this:
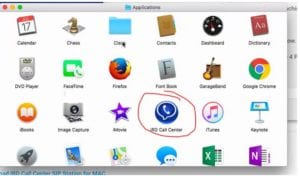
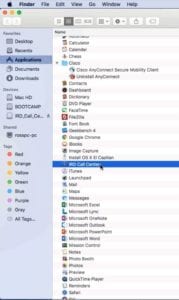
6. Once the install progress bar completes, open your application folder and launch the IRD Call Center SIP phone. Depending on your settings, you may see either icons, or a list of applications:
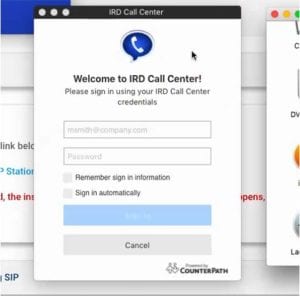
7. Once launched, the IRD Call Center icon will appear on your task bar. When you see the icon appear, click it to open up the app, and then click “Open” on the right:
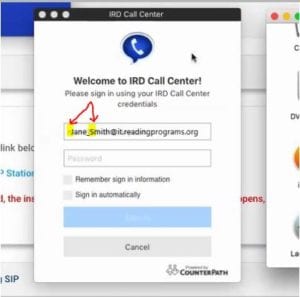
8. When the login page appears, enter Firstname_Lastname@it.readingprograms.org as your username. Your password is the same password you use to log into your VPN.
NOTE: The first letter of your first name, and of your last name needs to be capitalized (e.g.: Jane_Smith@it.readingprograms.org). Your login will fail if you do not do this.
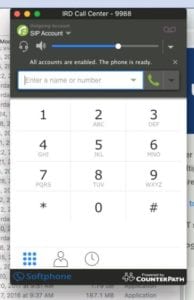
Here’s what the application looks like after you log in:
Problem Solving
1. To watch a video on installing SIP on MAC, click here.
2. Make sure that you copy-paste your credentials from the email you received with your tech setup instructions.
3. Work through the install steps again to make sure you didn’t miss anything.
4. If you are still encountering issues, please chat IT Support using the chat feature on the upper-right of this web page.
Step 5: Test Call and Adjust View Settings
You’ll now test receiving a call using your SIP softphone in Interaction Connect.
Before you begin working through the steps listed below, make sure that your SonicWall VPN is connected.
Remember to use Chrome as your browser.
Test Call
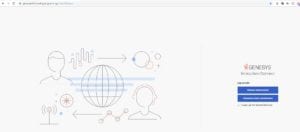
1. Make sure your USB headset is plugged directly into your machine and then click this link to go to our Interaction Connect login page.
2. Bookmark the page so that you can easily find it later. Do this by clicking the little star icon on the far-right of the URL bar:

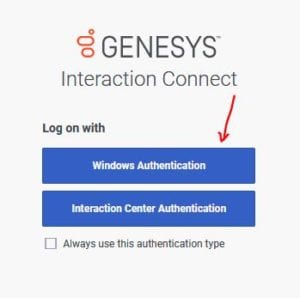
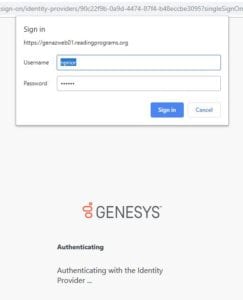
3. Click “Windows Authentication” as your login method:
4. In the drop-down that appears from the top of your browser screen, enter your username and password. Click “Sign In”.
TIP: If you have trouble with this step, try entering your username with IRDEV\ in front of your username (e.g.: IRDEV\jsmith).
After clicking “Sign In”, Chrome may ask if you would like to enable notifications, click on “Enable”, and then click “Allow”.
5. From the “Choose a Station” menu box, click the drop-down toggle to the right of the station type field, and select “Workstation” from the list. Enter your station name (username_Station_Mac):
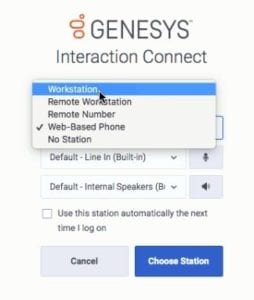
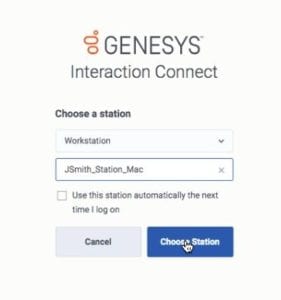
Make sure your USB headset is selected as your microphone and speaker options, and then click the blue “Choose Station” button on the bottom-right.
6. Change your status to “Available” on the mid-right of the task bar (you will have been automatically set to “Not Ready” upon login):
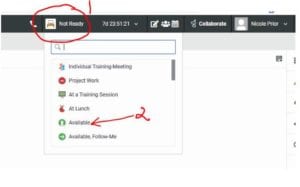
7. Click the icon of the phone to the left of the “Available” status:
![]()
Type 8009032755 into the “Dial a Number” field (no dashes, or spaces):
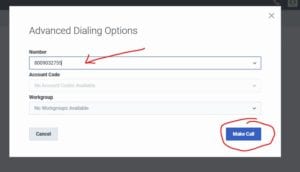
Click the blue “Make Call” button on the bottom right of the menu.
8. Once you reach the voicemail box, leave a message with your full name and phone number, and tell us what city and state you’re calling from. A member of our team will listen to confirm your test call and check your call quality: if the tech hears an issue, he or she will reach out to you to test again.
Step 9: Click the red “Disconnect” icon to end the call from Interaction Connect:

Adjust View Settings
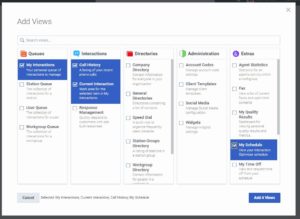
1. Click the blue “Add Views” text in the middle of the screen:

2. Select “My Interactions”, “Call History”, “Current Interaction”, and “My Schedule” options, and then click the blue “Add 4 Views” button on the bottom-right of the pop-up:
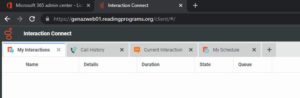
Your view should now look like this:
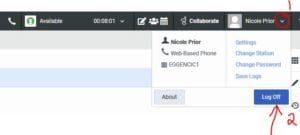
3. Log out of Interaction Connect: click the downward arrow on the upper-right of the screen, and then click the blue “Log Off” button.
Problem-Solving Guidance
If you are not able to successfully complete a test call on your first try, please check your credentials against the email you received with your login information and go through the steps one more time. If you are still not successful, please use the chat feature pop-out on the right of this page to contact IT Help Desk.
Even if you did not complete your test call, please move on to Step 6: Submit Webform.
Step 6: Submit Webform
Please complete the webform below to let us know that you’ve completed tech setup, or that you’ve encountered trouble. If you need assistance and didn’t reach anyone via chat, a support tech will reach out to you as soon as possible after reading your entry.
NOTE: Everyone must complete the form. The form is used to verify that you’re ready for training.
Copyright © 2024 Institute of Reading Development